To switch DNS from Hostinger to Cloudflare, first add your site to Cloudflare, then update your domain’s nameservers to the ones provided by Cloudflare. Confirm the changes by checking your DNS propagation status.
Navigating the transition from Hostinger’s DNS management to Cloudflare’s free DNS service can greatly enhance your website’s performance and security. This succinct guide helps website owners understand the simple steps required for a seamless switch. Utilizing Cloudflare’s DNS services not only improves site speed through global content delivery networks but also provides robust protection against DDoS attacks and malicious traffic.
The process involves registering with Cloudflare, adding your website, and then updating your nameservers within Hostinger’s control panel. Executing this change properly ensures minimal downtime and a fluid shift to take advantage of Cloudflare’s expansive network of servers. Website administrators can easily upgrade their site’s infrastructure with improved performance, security, and reliability by following these straightforward steps.

Credit: www.hostinger.com
Introduction To Dns Switching
Making changes to DNS settings can feel daunting, but it’s a powerful step toward better site performance and security. Think of the DNS, or Domain Name System, as the internet’s phonebook. It connects domain names with the IP addresses needed to access websites. Ready for a change? Follow these simple steps to switch your DNS from Hostinger to Cloudflare’s Free DNS service.
The Importance Of Dns For Your Website
DNS is crucial for helping users find your site. A fast and reliable DNS provider ensures quicker lookups, meaning users reach your website without delays. Swapping your DNS can be the behind-the-scenes hero that boosts site speed. It can also improve security. Taking control of your DNS settings is straightforward,
and the benefits are immense. Especially when you choose a provider like Cloudflare to handle your DNS queries.
Benefits Of Using Cloudflare’s Free Dns Service
- Speed: Cloudflare’s network ensures quick DNS resolutions globally.
- Security: Protect your site against DDoS attacks with Cloudflare’s robust infrastructure.
- Privacy: Cloudflare respects user data and promises to never sell it.
- Uptime: Reduce website downtime with Cloudflare’s resilient network.
By switching to Cloudflare, you tap into these advantages for free. Keep your site safe, fast, and secure with just a few steps.
Preparing For The Transition
Moving your DNS from Hostinger to Cloudflare can seem daunting, but fear not! This step-by-step guide will ensure a smooth transition. Backing up your current records, understanding Hostinger’s DNS settings, and creating a Cloudflare account are crucial first steps. Let’s dive in and make the switch with ease.
Backing Up Current Dns Records
Keeping a record of your DNS information is essential before making any changes. This backup acts as a safety net.
- Navigate to your Hostinger control panel.
- Go to the ‘DNS/Zone Editor’ section.
- Copy all existing DNS records into a document.
Ensure each entry is noted, including A, CNAME, MX, and TXT records.
Understanding Hostinger’s Dns Settings
To manage DNS with precision, a clear understanding of Hostinger’s DNS settings is needed.
Hostinger organizes DNS records for optimal domain management. Each type serves a specific purpose:
- A Records – connect your domain to an IP address.
- CNAME Records – point your domain to another domain name.
- MX Records – control where your emails are received.
- TXT Records – provide text notes to external sources.
Familiarize yourself with these to understand their roles in your DNS setup.
Creating A Cloudflare Account
Setting up a Cloudflare account is your next move. Visit https://www.cloudflare.com/ and follow these steps:
- Click on the ‘Sign Up’ button.
- Enter your email and create a password.
- Verify your email to activate your account.
With your account ready, you’re set to begin the journey to a more secure and reliable DNS service with Cloudflare!
Initiating The Switch To Cloudflare
Initiating the Switch to Cloudflare marks a crucial step towards boosting your website’s performance and security. Cloudflare’s Free DNS service offers numerous benefits, such as enhanced speed and protection against DDoS attacks. Transitioning from your current DNS provider, like Hostinger, to Cloudflare doesn’t have to be complicated. Follow this easy guide to make the shift seamlessly.
Adding Your Domain To Cloudflare
Start by creating a Cloudflare account at https://cloudflare.com. After logging in, select ‘Add a Site’ from the Cloudflare dashboard. Enter your domain name and let Cloudflare scan your domain’s DNS records. This process initiates the setup.
Next, choose a plan. You can opt for the free version to enjoy basic protections and performance enhancements. Confirm the plan to proceed to the next phase – DNS configuration.
Copying Dns Records From Hostinger To Cloudflare
Log in to your Hostinger account and navigate to the DNS Zone Editor. Here you’ll find a list of your existing DNS records. Open Cloudflare in a new tab; you’ll need them both.
- In Cloudflare, go to the DNS tab.
- Refer to your Hostinger DNS Zone Editor and copy each DNS record.
- Paste each record into the corresponding fields in Cloudflare’s DNS tab.
Ensure all the records match. Missing or incorrect records can disrupt your website service. Once you’ve copied all records, the technical setup on Cloudflare’s side is complete.
Note: The switch isn’t finished yet; your domain’s nameservers still point to Hostinger. To finalize the switch, you’ll need to update the nameserver details at your domain registrar with the ones provided by Cloudflare. Expect propagation to take some time, during which your website will become fully protected and accelerated by Cloudflare!
Credit: www.hostinger.com
Verification And Testing
Making the switch from Hostinger to Cloudflare’s Free DNS service requires careful steps. One crucial phase after the switch is the ‘Verification and Testing’. This ensures everything works smoothly after the transfer. It’s important to check records and test accessibility. This guide helps you through these final, yet vital, steps.
Verifying The Copied Dns Records
After moving DNS records to Cloudflare, verifying them is essential. This confirmation ensures all existing records from Hostinger are now accurately replicated in Cloudflare. Here’s how to check:
- Log in to your Cloudflare account.
- Go to the DNS section of your website.
- Review the list of DNS records.
- Ensure they match the records from Hostinger.
Take note of any discrepancies and make the necessary adjustments. It is critical for your site’s connectivity and email operations.
Testing Site Accessibility Post-switch
Checking site accessibility after changing DNS is a must. This confirms that users can reach your site without issues. Follow these simple steps:
- Open a web browser.
- Type your website’s URL.
- Hit Enter and observe if the site loads.
- Try different browsers and devices.
Also, you can use online tools like ping and traceroute to ensure your site is reachable. Look out for any loading errors and take action if needed.
To guarantee full propagation, this testing should be done periodically over 48 hours. This accounts for global DNS propagation times. Keep your site running smoothly with these verification and testing practices!
Finalizing The Dns Migration
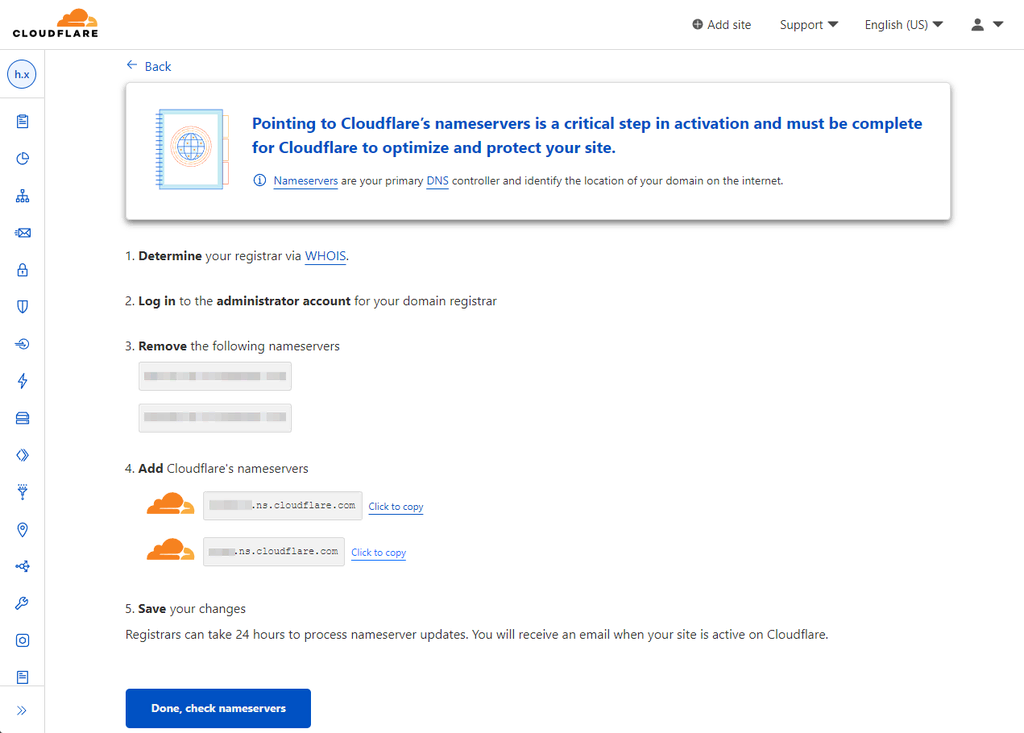
Finalizing the DNS Migration marks the pivot where you take the leap from Hostinger to Cloudflare, waving goodbye to old settings and embracing enhanced security and performance. This step-by-step guide ensures your transition is smooth and hiccup-free. Let’s commence the final leg of our journey with updating nameservers at Hostinger.
Updating Nameservers At Hostinger
- Log in to your Hostinger account.
- Navigate to the Domain section.
- Click on Manage next to your domain.
- Scroll to the Nameservers settings.
- Enter Cloudflare’s nameservers provided.
- Save the changes.
Within 48 hours, DNS migration will start. But, patience is key. Let’s monitor the process closely.
Monitoring The Propagation Period
DNS propagation is like a game of digital whisper, it takes time. You can use online tools to track this process:
- Visit DNS checker websites.
- Input your domain name.
- Watch as the new Cloudflare nameservers spread worldwide.
Key Takeaway: DNS updates can take 24-48 hours. Regular checks ensure everything is on track. Once propagated, you’re all set with Cloudflare’s free DNS service!

Credit: m.youtube.com
Post-switch Actions And Best Practices
So you’ve made the switch from Hostinger to Cloudflare’s Free DNS service. What’s next? Taking the right post-switch actions ensures your site’s security, performance, and reliability doesn’t miss a beat. Here are the best practices to help you smooth out any wrinkles after transitioning your DNS.
Reviewing Cloudflare’s Security Features
Cloudflare offers a suite of security features to safeguard your site. Enable these settings to prevent attacks:
- Web Application Firewall (WAF): Blocks harmful traffic.
- Rate Limiting: Stops abuse of resources.
- SSL/TLS: Encrypts data exchanged online.
- DDoS Protection: Keeps your site online during attacks.
Setting Up Cloudflare Analytics
Understand your traffic and threats with analytics. Here’s how to set it up:
- Log in to your Cloudflare dashboard.
- Click the ‘Analytics’ tab.
- Customize your dashboard to monitor traffic patterns and threats.
Maintaining Dns Health After The Transition
Keep your DNS in top shape with these steps:
| Action | Purpose |
|---|---|
| Regularly check DNS records. | Ensures records are up-to-date. |
| Audit your setup. | Confirms proper configuration. |
| Monitor response times. | Assists in dodging downtimes. |
Frequently Asked Questions Of Step-by-step: Switch Dns From Hostinger To Cloudflare Free Dns Service!
Why Switch Dns To Cloudflare?
Switching to Cloudflare’s free DNS service can improve your website’s speed and security. Cloudflare has a vast network of data centers around the world that help in reducing latency by resolving DNS queries faster and providing DDoS protection.
How To Change Hostinger Dns Settings?
To change Hostinger’s DNS settings, log into your Hostinger account, navigate to the domain management section, and replace the current DNS with Cloudflare’s nameservers. Save the changes and wait for them to propagate.
Is Cloudflare Dns Service Truly Free?
Yes, Cloudflare offers a free DNS service that includes benefits like improved speed, added security, and redundancy. They provide this service without any hidden costs, making it a popular choice for individuals and businesses.
What Are Cloudflare’s Dns Server Addresses?
Cloudflare’s DNS server addresses are `1. 1. 1. 1` for the primary server and `1. 0. 0. 1` for the secondary. These addresses are designed to be easy to remember and to provide fast, secure DNS services.
Conclusion
Switching your DNS to Cloudflare Free DNS service doesn’t have to be daunting. Follow the steps outlined and enjoy the benefits of enhanced speed and security. Remember, this small change can significantly impact your site’s performance. Ready to make the switch?
Embrace Cloudflare’s robust features and elevate your online presence today!