Are you concerned about your web app cloud hosting? Do you want a responsible hosting platform that can manage all aspects of your server but don’t want to invest in many platforms? Well, then Cloudways is for you.
If you want WordPress hosting that will quadruple your performance for half the price of other well-known hosting providers, Cloudways is the way to go. Cloudways is a managed hosting company that focuses on efficiency and ease of use.
Cloudways takes care of everything from servers and app setup to continuous server maintenance so that you can ensure the growth of your web app. It’s better to see a full Cloudways hosting review before you start using it to grow your web app.

Let’s start with our detailed Cloudways hosting review.
Cloudways Hosting Overview
| Aspect of Cloudways | Ratings |
|---|---|
| Speed | ★★★★★ |
| Pricing | ★★★★★ |
| User Friendly | ★★★ |
| Caching | ★★★★★ |
| Support | ★★★★ |
| Scalability | ★★★★★ |
| Email/SMTP | ★★★★ |
| Overall review | 4.5/5 |
Cloudways Hosting Pros
Cloudways is said to be one of the best for cloud hosting management. Well, it has certain pros to support the statement.
Cloudways Hosting Cons
No good thing comes without cons. Cloudways has its cons too. Which are:
Cloudways Hosting Review: It’s Features
The features are divided into many sections and subsections. Here is a simplified breakdown of each section.
Speed And Performance
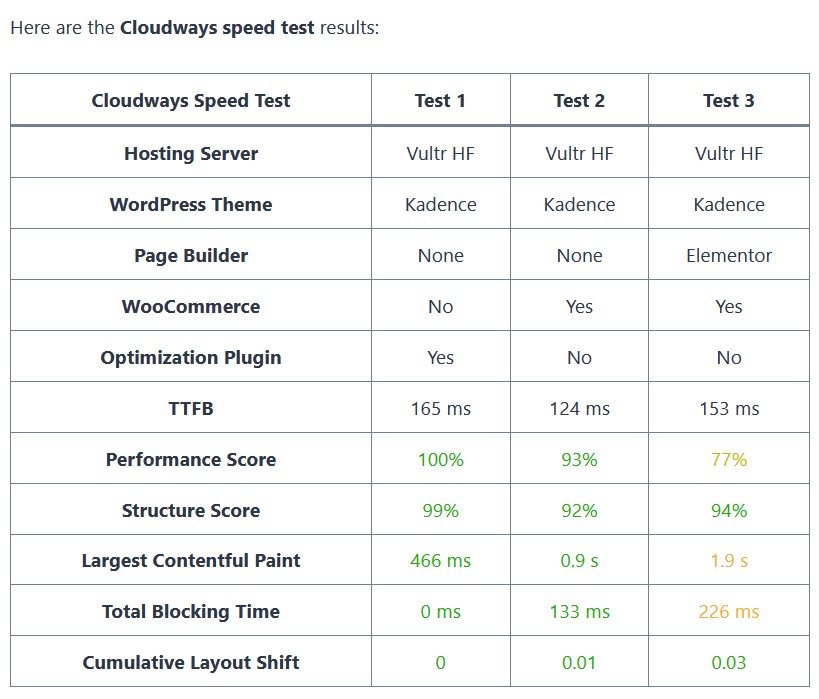
Cloudways speed and performance are reviewed very well by the users. It is also said to be the best if compared to other similar services in the market. Here’s the result of a speed test done by StartBlogging101
Cloudways Hosting Performance: Test 1
This test demonstrates the speed a new website on a Cloudways Vultr HF server can achieve. The Kadence theme, which is very lightweight, is used. This test does not use any page builders or WooCommerce, but it does make use of Cloudways’ default Breeze optimization plugin.

TTFB (Time To First Byte) and Largest Contentful Paint were 165 and 466 ms. Both are impressive numbers. The TTFB is twice as fast in comparison to other sites. And many sites without plugins contain more LP than what the test found.
Total blocking time was 0ms, and Cumulative Layout Shift was 0. Performance and structure scores were 100% and 99%, which leaves little to no room for improvement,
Cloudways Hosting Performance: Test 2
This test explores how fast a Cloudways Vultr HF server would manage a complex setup. This test used the Kadence starter template plugin to import a “Print Store” starter template that does not use a page builder (just a WordPress block editor named Gutenberg), Kadence Blocks, or WooCommerce.

The default Breeze optimization plugin was turned off to see the raw performance figures without any front-end tweaking. The performance and structure scores this test got were 93% and 92%.
The TTFB and LCP were 124 ms and 0.9 s, which is much better in comparison to other sites. The TBT was just 133 milliseconds, and the CLS was only 0.01 milliseconds. As per Google, these are excellent figures that are all “green.”
Cloudways Hosting Performance: Test 3
This test is exactly like test 2. It included the same starter template, but it also carried WooCommerce. The default Breeze optimization plugin was also turned off.
But rather than using Gutenberg, the test used an Elementor page builder. This test was scored 77% and 94% based on the performance and structure.
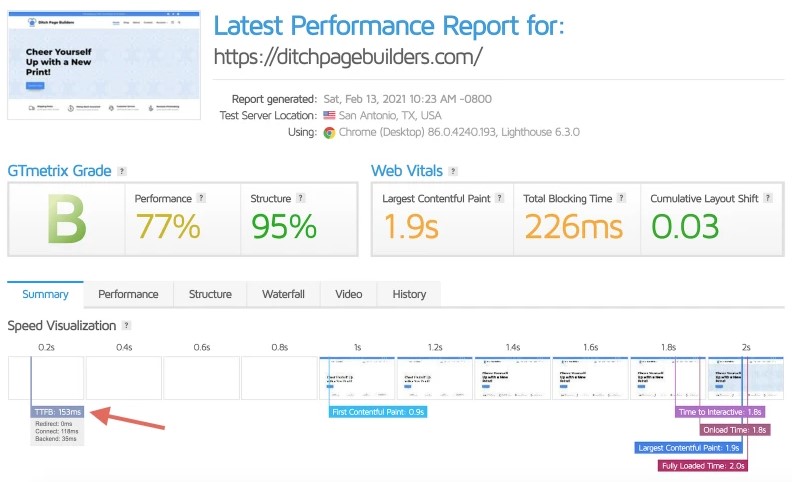
The TTFB and LCP were 153 ms and 1.9 s, which is incredible if we look at the Elementor page builder that was used, The TBT was 226 ms, and the CLS was only 0.03. The TBT could be improved, but it is expected if the site is made with Elementor
Cloudways Review: Ease Of Use
Rather than using a traditional cPanel, Cloudways uses a unique control panel that has a little bit of a learning curve for beginners. But then again, it’s normal to take time to get used to something new.
The control panel of Cloudways is very sleek and detailed. Go through it for a couple of weeks, and it will be very easy for you to navigate through. There are two major parts of this control panel. e.g., Applications and Servers
Applications: This part of the panel has all the things you need to install. Depending on which kind of website you want to run, you can install WordPress, WooCommerce, or non-WordPress applications from this section.
After you have signed up with Cloudways, you will see a selection of options. From the WordPress options, you can choose,
- WordPress, WordPress multiple
- There is no Cloudways optimized option in WordPress, which is labeled as “WordPress clean.”
- WooCommerce alongside WordPress (WordPress + WooCommerce)
From the non-WordPress selection, you can choose,
- Laravel
- Magneto (with Varnish)
- Magneto (with Elasticsearch)
- Custom PHP App
- Servers
After you have gone through the installation process, you can determine the details of your server. The decision is totally based on your preference as to which server you want to use for hosting.
Choose Server Providers: The name of the server provided is given. Choose one.
- DigitalOcean
- Vultr
- Linode
- Google Cloud
- Amazon Web Services (AWS)
Determine The Server Size: After you are done with your application and server selection, choose the server size. You must choose the right size of the server.
Choose Your Location: Choose the server location based on where you expect the majority of traffic would be. Or go for the location closest to that zone.
Then simply click the “Launch Now” button. Your complete application and web server will be launched in minutes, and then it will be up and running!
Cloudways Control Panel Walkthrough
The Cloudways control panel is much more refined than the cPanel other websites use. It is divided into two sectors to make navigation and management easy for you. Those are “Application management” and “Server management”. Here is a detailed guide to this panel.
Application Management
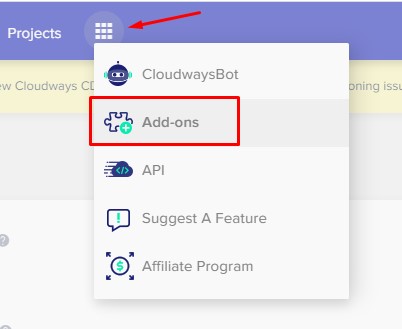
On the application management panel, you will see a dropdown menu carrying the following options:
Access details
The Cloudways ‘Access Details’ page displays data about the many ways you may connect with your app. There are four sections here:

Application URL: Here, you will find the URL of your site. There are also documents containing information about SSH/SFP access.
Admin Panel: You will get your WordPress admin URL, your user name, and your password in this section.
My SQL Access: Here are the credentials of your database, such as DB name, username, and password, which you will need if you want to access your site’s database.
Application credentials: There are two blank boxes for username and password, which you can fill in to create and use multiple application credentials for SFTP and SSH access. You will also see a public IP given there.
Monitoring
This option does every kind of monitoring for you. If you click on it, a dropdown menu consisting of “Analytics” will appear.
Analytics
This section carries various options such as Traffic, PHP, Database, Running crons, and Data usage.
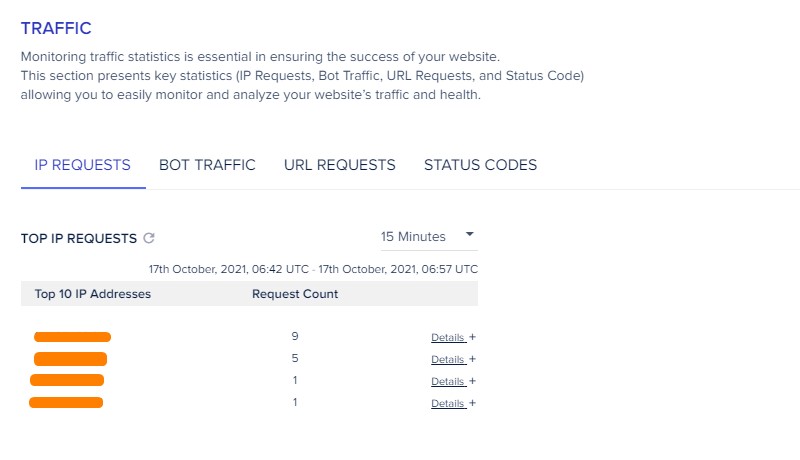
Traffic
This section offers you everything you will need to maintain good traffic consistency on your site. Cloudways provides quick and easy monitoring of your website using analytics and logs. The section includes:
- IP requests: here, you can see the topmost IP requests of your website and the request count. At first, click and choose a time period, i.e., 1 hour, 2 hours. You can also get additional information on specific IP requests by clicking on the “Details” option.
- Bot traffic: here, you can see the top bots that are providing traffic to the application. Again, choose a time period of a day.
- Top URL requests: you can choose a time period and see the top requesting URLs and request count of your website. The “Details” option will give you much more detailed information about that request URL.
- Status codes: here, you will get the status codes of the requests you get on your web application. You can also see the request count against that particular status code by clicking the “Details” option.
PHP
This area contains essential information about a web app’s PHP efficiency, such as the most frequently requested pages, slowest pages, and running PHP processes. To examine analytics, see the detailed description.
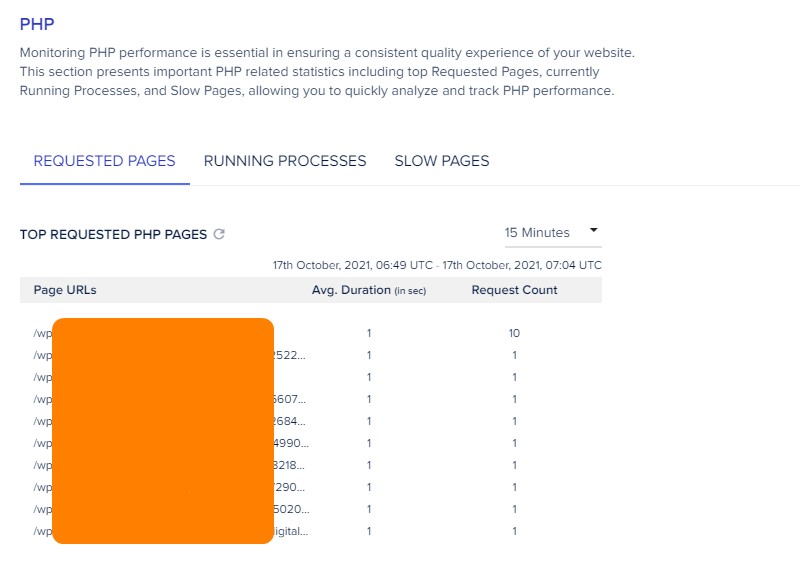
Requested Pages Tab: This displays the most popular PHP page URLs, as well as their typical duration and request count.
Running Processes Tab: this displays active PHP and PHP-FPM processes, as well as the CPU and memory use and duration.
Slow Pages Tab: it displays the number of slow PHP pages/scripts requested, as well as the request count, maximum, and average amount of time. This area will be used to track any PHP page/script that takes longer than 5 seconds to load.
Apart from the “Traffic” and “PHP”, you can also see your folder use, database usage, and overall usage on this page. Also, you can debug the problems by viewing access and error logs for Apache, NGINX, and PHP.
Bot Protection
Cloudways Bot Protection protects the safety and security of your WordPress website. It prevents hackers and bots from causing damage to your website. If you choose to select this option, you will get,
- No installation protection system because MalCare Security automatically adds a new plugin named “Bot Protection” to your website.
- Protection for the login page.
- Suspicious activity filtered out.
- Monitoring dashboard
- All server plans have this feature.
- No effect on the site’s efficiency.
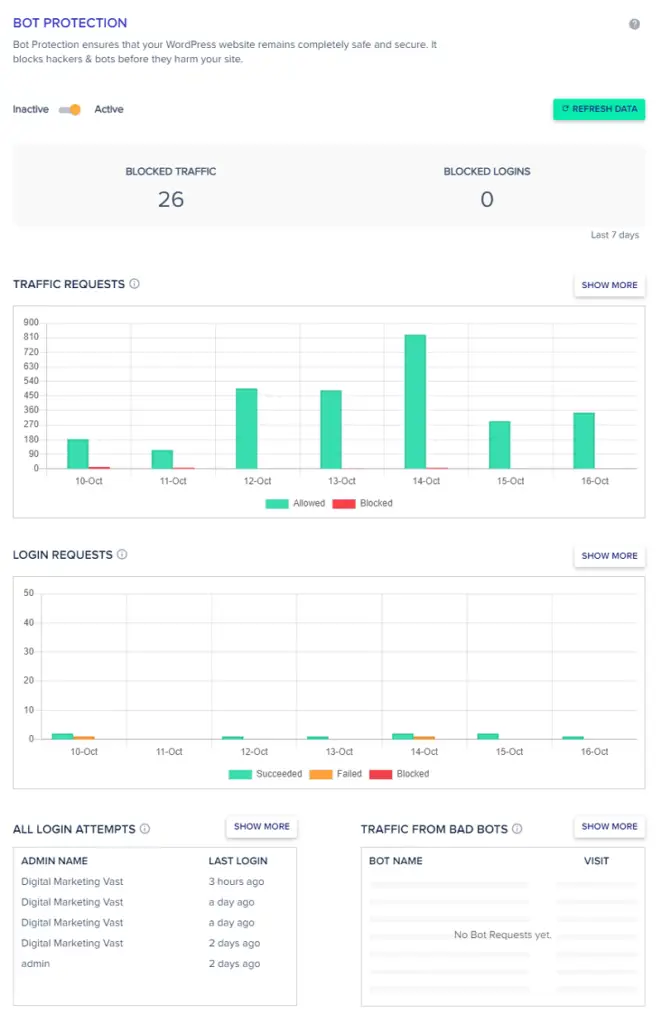
It is suggested that you activate this option. What this panel has:
Quick Stats: you can view the number of blocked requests and login attempts
Traffic Requests: you can see a graph of the numbers of permitted and/or blocked requests.
Login Requests: Graph the number of login attempts performed on the wp-admin panel in real-time.
All Login Attempts: You can view the most recent login attempts on the WordPress-admin panel with the admin name and password.
Bad Bots Traffic: you can see all the detected and blacklisted bots.
Domain Management

You will see that it’s written that “point your domain to a web app”. It actually does that.
This option allows you to write your principal domain as well as any other domain. You will see that you can add additional domains and then save the changes to store your edits.
When you register for a Cloudways tryout, you’ll be given access to a Cloudways-provided momentary domain.
Cron Job Manager

For the web application, Cloudways offers a Cron Job Manager. A Cron Job is a useful software that allows you to schedule activities to be completed at a later time. Only professional people that know their way around it are advised to use this program.
Additional Cron jobs can also be added here. Then to configure it, you must first determine how frequently the cron job will run. You can choose from a drop-down menu of predetermined values or enter your own.
You have to define the type of scripts to run as well as the command to perform. Save by clicking submit. Once completed, your cron job will be shown underneath the Basic tab. But command line switches and other edits can only be done in the advanced tab option.
SSL Certificate

Let’s Encrypt is a project that seeks to provide free digital SSL/TLS certifications to individuals who would like to switch to HTTPS. Cloudways is a supporter of this endeavor and provides simple deployment through its platform.
But, installing Let’s Encrypt SSL Certificates has certain drawbacks. Weekly, no more than 5 licenses per precise FQDN (Fully Qualified Domain Name) will be granted. A maximum of 100 SANs (Subject Alternative Names) can be stored on a license.
So you must split your system into several apps and put SSL certificates on these several apps to support over a hundred SANs (Subject Alternative Names).
Also, the certificate will expire after 90 days. You can either choose to have the SSL certificate renewed automatically or according to your wishes using the Cloudways Platform. Automatic renewal renews the certificate 30 days before the expiration.
Backup and Restore
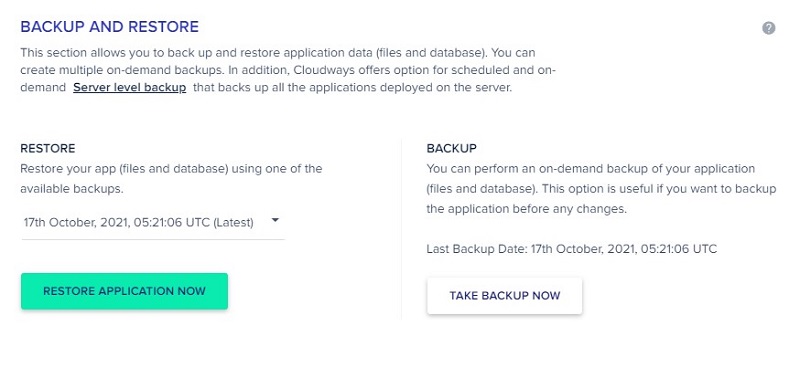
This feature is quite useful since it lets you generate numerous backups on the fly by just pressing the “Take Backup Now” icon.
Before you make any changes to your application, choose the ” Take Backup Now” icon. So, you can always back up the previous application if you don’t like the new one. By selecting a restore icon from the menu and pressing the “Restore Application Now” option, you can easily recover the WordPress app (including files and database).
Deployment via Git

To use this functionality, follow the process:
- You’ll need to create an SSH key. If you hadn’t done so previously, simply click the “Generate SSH Key” button.
- Then Without any need for a password, the SSH key recognizes your server. After hitting the button, a new window will wait just a few moments for Cloudways to produce an SSH key.
- After Cloudways is done creating an SSH key, click View SSH Key to retrieve it. For example, you can add the key to your favorite Git client. For example, you can add it to Bitbucket, Github, Assembla, etc.
- You will also see a “View Deployment Logs” option.
- Next, to authorize, you must provide your Git Remote Address.
- As a result of this, the branch name will also be retrieved. Here, the master will be chosen as a default. Then you will see that the Deployment Path is configured to public html/.
- Finally, deploy the code by clicking the “Start Deployment” button,

The process is finished. Successfully. You can now fetch your most recent modifications whenever you wish.
Application Settings
This section is divided into 3 subsections to manage your accounts and all kinds of settings. Configurations are divided into the General, PHP/FPM Settings, and Varnish Settings.
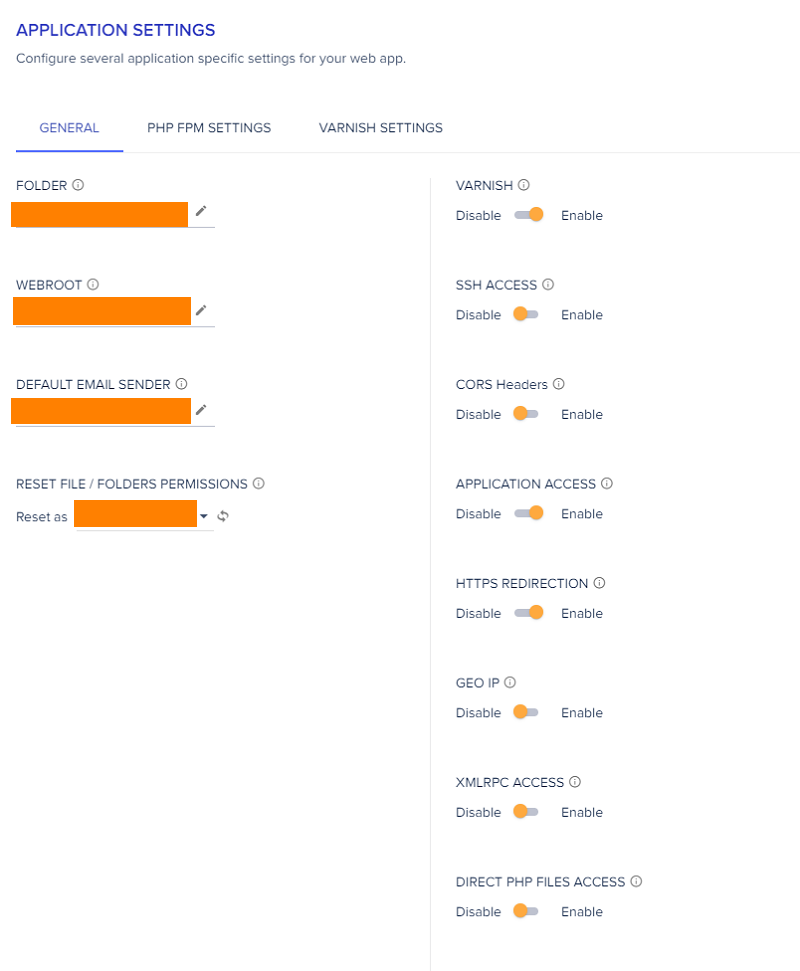
General
One part of it holds a component where you put your data, and the other parts have some simple enabling/disabling options.
- Folder: This feature renames the app folder, and the renamed title has a symbolic connection with the original name.
- Webroot: Usually, the default Webroot given is public HTML/. But here you can change that and put your own value
- From Address: If your site has an emailing add-on and you wish to utilize a customized email address to send emails, you could create a “From Address.” Email hosting is not included in Cloudways’ hosting plans, but it is available as an add-on.
- Reset File/Folders Permissions: All documents in your app will be given the default permission of Cloudways, and ownership will be transferred to the main r or primary user.
- Varnish: it is a layer of caching provided by Cloudways. Enabling this setting is better. But disable it when you develop or test anything on the software’s previous versions that don’t have this feature.
- SSH Access: Enabling and disabling this controls whether your teammates will have the applications’ SSH access.
- CORS Headers: When you enable this, it allows the cross-origin sharing of resources.
- Application Access: This controls whether or not your web app may be accessed. Upon disabling the web app, it is still seen on the platform. However, any current crons for the application will be disabled. Whenever your app is visited over the web, it will display a “Service Unavailable” condition.
- HTTPS Redirection: This option should be turned on as enabling it causes all domains mapped to an app to have a permanent redirection. This improves the app security of the application across all domains that are mapped to it.
- GeoIP: GeoIP is a technique for tracking different data about your site users, including their region, organization, and other factors. Your application must have the inbuilt capacity to run and execute such a feature once it has been activated.
- XMLRPC Access: To protect your application from brute force attacks, disable XMLRPC requests. Unless you’re utilizing XMLRPC, it’s highly recommended that you deactivate this option to protect your app against attacks.
PHP/FPM Settings

Since version 5.3.x, PHP-FPM has been accessible. The processor has a number of options that have a powerful effect on PHP application speed. If you feel the need to perform any more changes, you may change a variety of PHP settings.
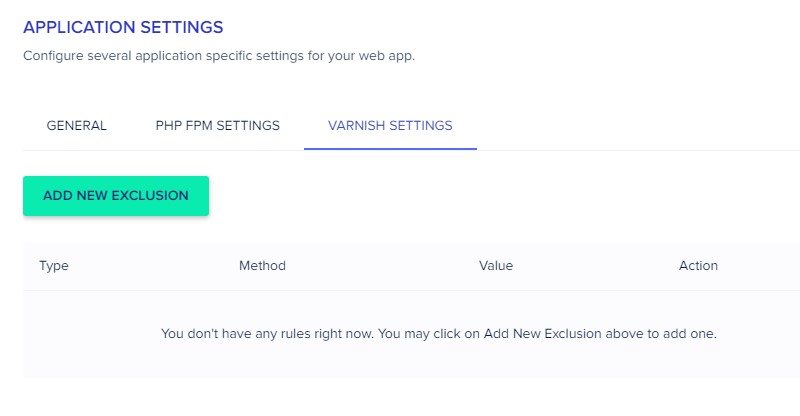
Varnish Settings
You will be able to use the “Add New Rule” button to indicate which pages you don’t want varnish to cache.
Migration Tools
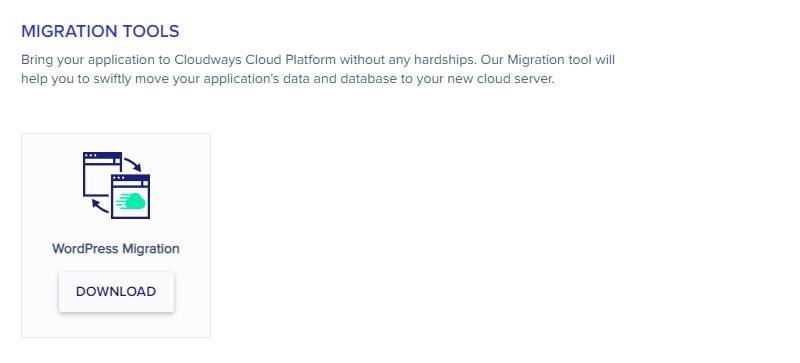
Cloudways Migration Tools offer a button that will download their WordPress Migration tool. This tool will allow you to easily bring your app to the Cloudways Cloud Platform.
When you first sign up with Cloudways, they offer 1 site migration for free, where they’ll do this for you themselves. If you need additional websites migrated after that, you can either do it yourself by using their Migrator plugin or pay $25 for each additional website.
Cloudways CDN
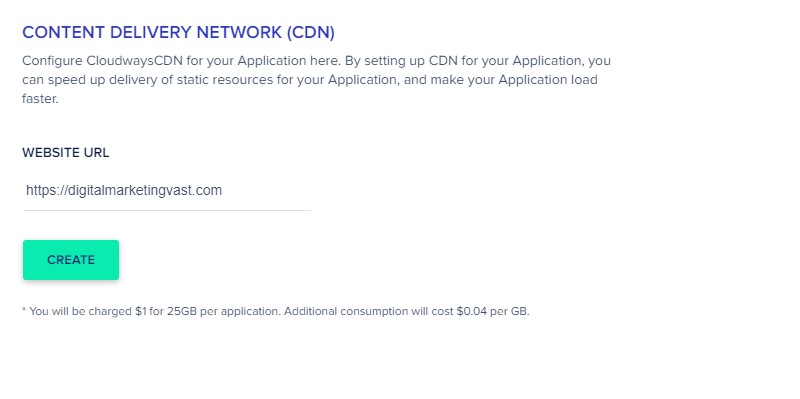
Cloudways has teamed up with StackPath to make setting up CloudwaysCDN for any WordPress application simple. Because Cloudways does not have any DNS services, employing Cloudflare for both your CDN and DNS will fill this lack and more. If you are using over 25 GB per program, you’ll be charged $1.04 per GB.
Server Management
This section carries all you need to manage and protect your server.
Master Credentials

In this area, you’ll find your Public IP and also your SFTP and SSH user names and passwords for all of your apps. In here,
- You could use the “SSH Public Keys” option to upload numerous SSH Public Keys on the server for access without having to provide a passcode.
- Also, you can press the “Launch SSH Terminal” option to open the SSH terminal on the webpage.
Server Monitoring
This panel is important to ensure the hassle-free and healthy operation of your server. These panels are divided into these three sections:
- Summary

Here you will see a summary of your server’s health. You will get the data for Ram usage, CPU usage, disk usage, and Bandwidth usage.
You’ll be getting alerts if you’re going close to hitting your limitations. And you will be able to scale your server’s capacity to offer it extra resources.
- Details
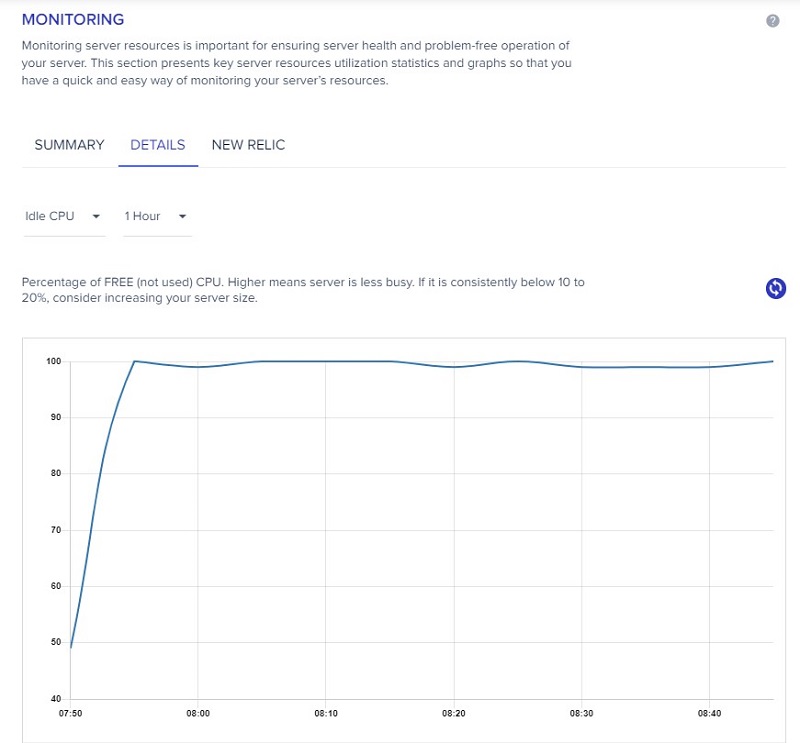
There are graphs that display things like idle CPU, vacant disk, readings and writes per second, free space.
The graph depicts the Idle CPU throughout the course of one hour. The graph depicts the proportion of CPU that is free (i.e., not in use). The less busy the server is, the higher the graph is. If this graph is constantly below 10%-20%, you might try raising the size of your servers.
- New Relic
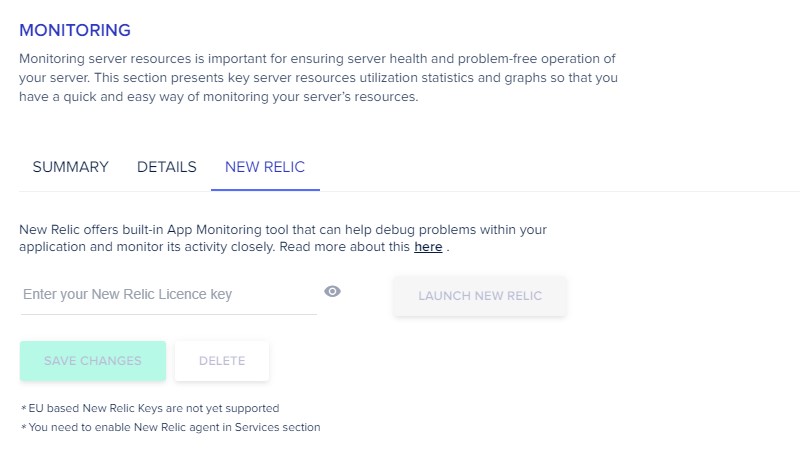
Cloudways now includes integrated app monitoring thanks to a partnership with New Relic. You could learn more about this by clicking the link given in the section. If you activate New Relic under the Manage Services area, the “Launch New Relic” option will be available, giving you instant access to much more extensive tracking
Manage Services
This controls the vital services of your app’s performance. The services are:

Apache: a server that serves your app’s contents.
Memcached: a caching layer that focuses on database queries. All of the caches are erased if the computer is rebooted, and it must be reconstructed.
MySQL: a database that you may use in your apps.
New Relic: With this application monitoring, you may get a lot of information.
Nginx: a server that serves static content for you.
PHP FPM (FastCGI Process Manager): a PHP FastCGI version with specific additional capabilities that are beneficial for sites of any scale, particularly busier ones.
Redis: Redis stores the entire database in memory.
Varnish: a level of caching (s). For production servers, this should not be disabled. Because otherwise, every cache gets lost if the computer is rebooted, and it must be rebuilt.
Restarting or halting services might disrupt the operation of your web app, so use caution while changing these settings. You can quickly check which services are operating and may resume, start, or stop other services. You can also see which ones might cleanse the Varnish cache and even deactivate Varnish.
Settings & Packages
| Basic | Set the maximum duration a request may run through the stacks with the execution limit.Set the size limit of a request throughout the stacks in Mb with Upload Size. Specify the highest memory space (in megabytes) a PHP request is permitted to utilize. It is better to increase the memory to 256 MB. Select whether or not PHP errors should be displayed with a display error. Select the degree of errors PHP should report with error reporting. Choose a PHP timezone with PHP Timezone. |
| Advanced | PHP SettingsMySQL SettingsApache SettingsNginx SettingsSystem SettingsVarnish Settings |
| Packages | PHP: Select your choice of PHP version. It can be upgraded or downgraded anytime. The recommended one is PHP 7.4. MySQL: Select your choice of MySQL version to use on your server. This can’t be downgraded after you’ve upgraded it once. The suggested one is MariaDB 10.4. Elasticsearch: Enable or disable this and select your preferred version. Redis: Deploys the Redis cache. It’s good to use Redis. Redis should be enabled in the Redis Object Cache plugin. Or you can enable it in the Breeze caching plan. Supervisord: It will install a supervisor. Laravel applications are presently supported by Supervisord. This isn’t required for WordPress. |
| Optimization | You can click on one of the following options and run cleanup for them or set up an automatic toggle for cleaning up. This will free spaces for you. Remove all files from the ‘tmp’ folder for all ApplicationsRemove all files from the ‘private HTML’ folder for all ApplicationsRemove all files from the ‘local backups’ folder for all ApplicationsRemove archived files from the ‘logs’ folder for all ApplicationsRemove archived files from ‘/var/log’ folder |
| Maintenance | It helps in improving security and maintaining stability. What it does: Upgrades all the existing operating systems. Apply security patches on them. Here you can choose a day and a time from a menu bar, then click “Save” to plan maintenance for that decided day and time every week. |
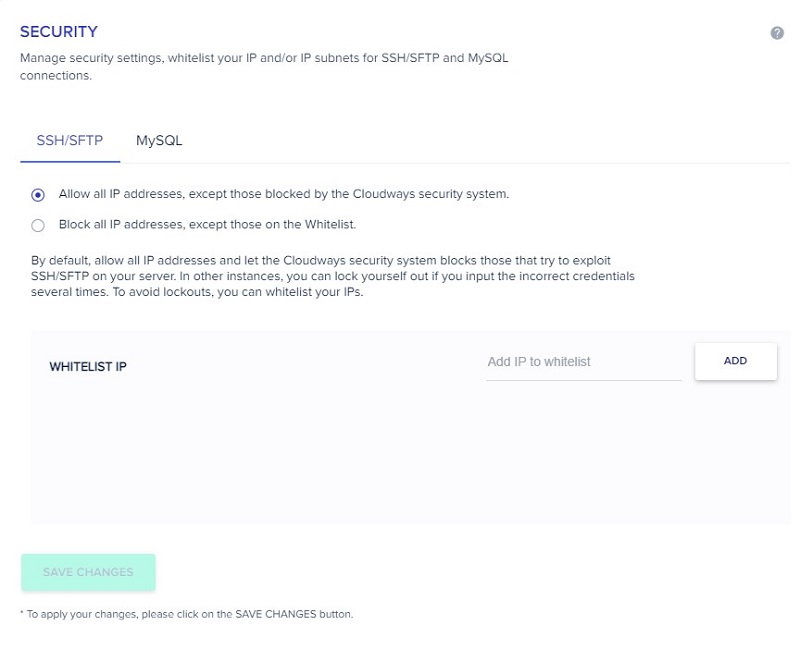
Security
You have a few choices in this area to increase the security of your webserver. Here you will have:
- Allow all IP addresses, except those blocked by the Cloudways security system: Except for the IP addresses that Cloudways has prohibited, this will allow all IP addresses to pass.
- Block all IP addresses, except those on the Whitelist: This allows you to ban all IP addresses except the ones in the Whitelist
Vertical Scaling

If you require extra resources, in this section, you can vertically extend your servers. Some servers will only be upscaled, so unless you utilize the clone option to clone the recent server to a fresh one, you probably won’t be able to scale it back downward.
If you follow the process correctly, your site should continue to grow in popularity as you provide more material, so you shouldn’t need to scale up. But if you do need it, simply drag the selector to the appropriate server size, then press the “Scale Now” icon.
Server Backups

This exactly does what it says. Backup your server. The options you will see on this page are:
Schedule Time: Specify your preferred backup time.
Backup Frequency: You can choose how often you want the backup to happen.
Backup Retention: Set the length of time you want the backup to be retained.
Local Server Backup: Enabling this option will ensure you have an extra set of backups available for you to download through SSH/SFTP.
Off-Site Backup Size: You will see the date of the last update and the size of the backup.
On-Demand Backup: This option will backup your server upon request. Additionally, a downloaded copy of all the apps will be created if the Local Backups settings are selected. You just have to simply click the “Take Backup Now” option to begin.
How To Configure SMTP in Cloudways Hosting

When employing Cloudways SMTP, you have two choices:
- Elastic Email (a premium service available through Cloudways Addons)
- “Your Own SMTP” Server.
After you’ve enabled your email extension, click the “Send Test Email” option to see if the SMTP configurations are correct.
Price Comparison Between Cloudways, SiteGround, BlueHost, And NameCheap
Here is a price comparison of all the mentioned hosting managing sites and an overview of some of their packages.
| Title | Cloudways | SiteGround | BlueHost | NameCheap |
|---|---|---|---|---|
| Entry Level | $10 / Month | $3.99/ Month | $3.95 / Month | $1.58/month |
| Plans | Managed Digital Ocean 1GB $10.00/month Managed DigitalOcean 2GB: $22.00/month Managed DigitalOcean 4GB: $42.00/month Managed DigitalOcean 8GB $80.00/month | StartUp: $3.99/month GrowBig: $6.69/month GoGeek: $10.69/month | Basic Shared Hosting: $3.95/month Plus Shared Hosting: $5.95/month Choice Plus Shared Hosting: $6.95/month | Stellar shared hosting: $1.58/month Stellar Plus shared hosting: $2.68/month Stellar Business shared hosting: $4.80/month |
Although Cloudways might seem costlier than the other sites, it’s worth it compared to some of these. As some of these gradually scale up the pricing, some offer less than what they charge, and some have more cons than pros.
Also, these hosting management platforms do not provide the same level of protection as Cloudways. It processes your WordPress site using a variety of security mechanisms. And using the pay-as-you-go fee method, you get more flexibility over your hosting expenses.
How To Start with Cloudways?
Cloudways gives you a 3-day free trial. But for that, you first have to set up your server application, add-ons, and everything else. Let’s go through the few steps of setting up for Cloudways.
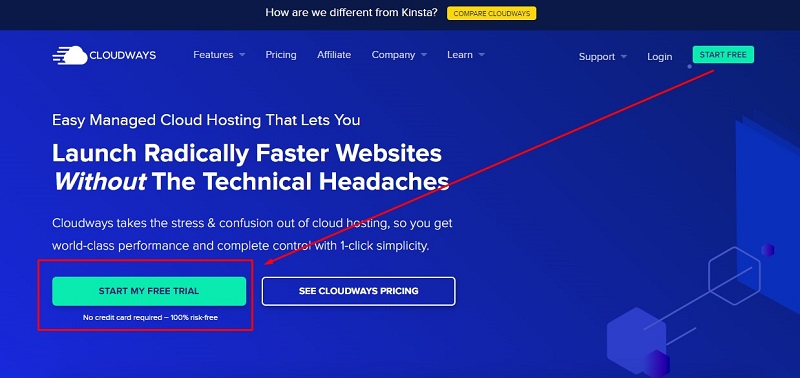
- Go to the official website of Cloudways.
- You will see a “Get Started Free” button. Click it.
- Sign up with all the information they asked for. Read the terms and conditions before posting.
- Click on “Start Free”

Adding Server And Location
The next step is to set up your own personalized server and application. To do that, follow these steps:

- Select a WordPress application. You will have multiple options to choose from, as mentioned in the “Easy TO Use’ section.
- You should name your newly managed application.
- You should also name your newly managed server
- To make Vultr your server, press the Vultr icon. Make sure you select High Frequency from the drop-down menu bar that appears next. Another choice is “standard”, but it doesn’t give as good a result as high frequency.
- Select a server size. For beginners, 1 Gb is more than enough as it can hold several websites.
- Select your choice of server location.
- Then press “Launch Now” and your server along with the application is successfully launched.
- Point DNS To Cloudways
- Get a domain name. Then you’ll have to direct the DNS to Cloudways after you’ve got a domain. Cloudways offers a tutorial about how to go live with your website for users.

Speed Optimizer Activation
As mentioned in the Server Packages subsection,
- upgrade your server to PHP 7.4, MariaDB 10.4, then download and enable Redis.
- Also, increase your memory size to 256 MB.
Add Plugins
You can use the Breeze plugin to add speed to your page. But WP Rocket outperforms Breeze in every way and is also the finest caching plugin available, with unrivaled ease of use. To use it, first activate it, then turn on the optimizations, and you’re done.

Selling Goods With Cloudways
Magento, WooCommerce, and Prestashop are just a few of the major e-commerce systems supported by Cloudways Hosting.

The hosting provider is geared for elevated Magento shops, which means more sales for your business. Multi-SSL installation, as well as built-in SSH and Git setups, are additional advantages. Your online business might also benefit from the added free migration option.

Cloudways hosting also supports WooCommerce, a prominent e-commerce platform. The hosting company has made sure to make installation as simple as possible. Support for WP-CLI, along with one-step server scalability for your business, are also included in the plans.
Conclusion
Cloudways provides you with not only a hosting management service but also helps you manage your server and scale your web app by providing an impressive feature set. It also makes good on its claim of no more sluggish WordPress websites or WordPress hosting hassles.
It also has a 3-day trial if you are confused about whether to go for it. But if you have read the features of Cloudways, you know it is worth the cost. After going through this detailed Cloudways hosting review, you can now focus on growing your business by letting Cloudways handle the hassle.